One of the biggest challenges in bird photography is learning how to expose properly for birds with extremely bright or extremely dark plumage. It is something nearly every photographer struggles with in the beginning. You can have perfect focus, beautiful behaviour, and great composition, but if the exposure is wrong, the image quickly falls apart.
White birds and black birds are difficult because they push your camera’s metering system beyond what it naturally wants to do. Cameras are designed to turn everything into a middle tone. When the scene is dominated by bright whites or deep blacks, the camera often makes the wrong decision unless you step in and take control.
This is why photographers often find that white birds look dull and grey, while black birds lose all detail and appear flat or muddy.
Understanding how your camera reads light is one of the most important steps toward becoming a more consistent bird photographer.

Why White Birds Are So Difficult to Expose Correctly
When you photograph a white bird, your camera sees all that brightness and tries to protect itself from overexposure. In doing so, it often darkens the image too much. Instead of clean, bright whites, the bird can end up looking grey and lifeless.
The real danger, however, comes when highlights are blown out. Once detail disappears from white feathers, it cannot truly be recovered later. Fine feather texture vanishes completely, especially in strong sunlight.
This is why photographing species such as gulls, kōtuku, spoonbills, or albatross can become surprisingly difficult, particularly in harsh daylight or reflective environments like water and sand.
The key is learning to expose as brightly as possible without losing highlight detail.
A technique many wildlife photographers use is called “exposing to the right.” This simply means pushing your exposure close to the brightest possible point while still retaining feather detail. Your histogram becomes incredibly important here. Rather than relying only on the rear screen, which can be misleading outdoors, the histogram tells you exactly how your tones are being recorded.
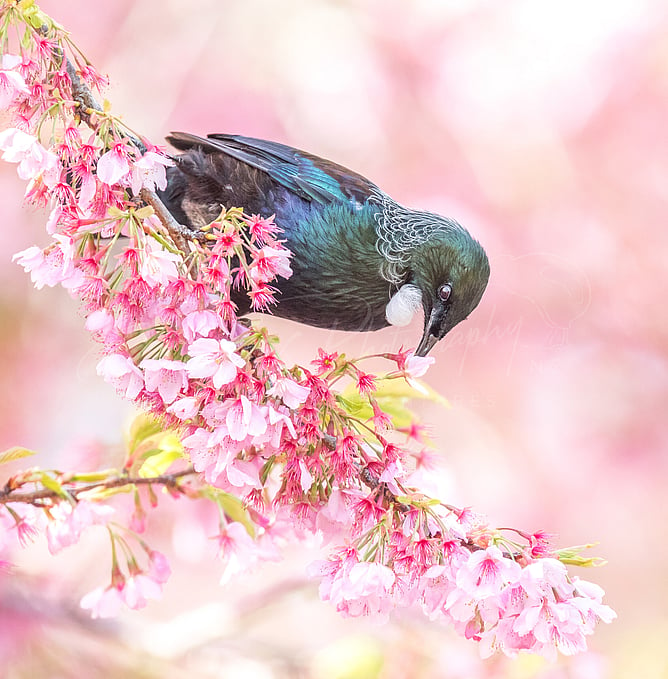
When photographing white birds, you generally want the histogram leaning toward the right-hand side without clipping hard against the edge, like in the photo below.
If highlights begin flashing on the bird, your camera is warning you that detail is being lost. A few tiny blinking spots on reflective feathers are usually acceptable, but large flashing areas across the bird’s body mean you need to reduce exposure slightly. So how do we do this?

Dial In Negative Exposure Compensation
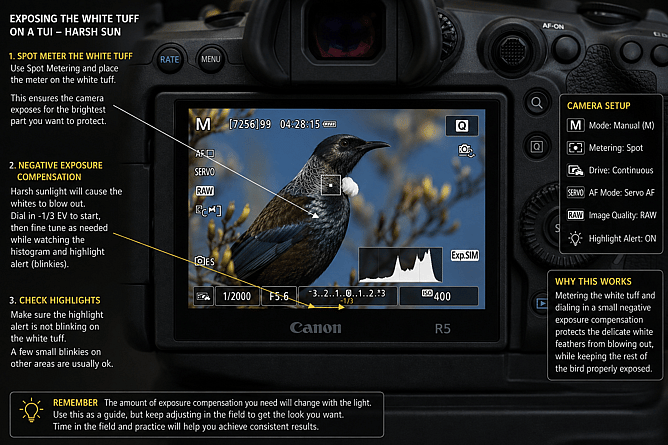
One of the easiest ways to do this is by using negative exposure compensation. In bright sunlight, starting around minus one-third of a stop is often enough. In very harsh conditions, you may need closer to minus two-thirds. If shooting in Manual mode on a Canon camera you will need to use auto ISO for this exposure compensation to work.
The important thing is not memorising exact numbers. Light changes constantly. A cloudy sky passing overhead or a bird turning toward the sun can dramatically shift exposure. Learning to quickly evaluate the scene and adjust accordingly is far more valuable than relying on fixed settings.
For very bright white birds in direct sunlight, try starting with:
-1/3 EV
-2/3 EV in harsh conditions
This helps protect feather detail before highlights clip.
Shoot in RAW
RAW files hold significantly more highlight detail than JPEGs.
This gives you far more flexibility when recovering whites during editing.

Why Black Birds Can Be Just as Difficult
Black birds create the opposite problem.
Instead of the camera darkening the image, it often brightens the exposure too much because it is trying to turn the dark subject into a middle tone. This can cause blacks to look washed out and unnatural while also clipping you're highlights and introducing noise into shadow areas.
Photographing species like Tui, Cormorants, or Black swans requires careful attention to detail because dark plumage often contains subtle texture and colour that can easily disappear.
Many photographers make the mistake of underexposing black birds because they are afraid of losing the dark tones. Unfortunately, this usually creates muddy shadows and noisy files that fall apart during editing.
In most situations, it is actually better to expose black birds slightly brighter than you think you should. (This is my preference, but how you get your finished result is up to your creative feel)
Adding a small amount of positive or Negative exposure compensation depending on your light often helps preserve feather detail while maintaining richness in the darker tones. Soft light becomes extremely important here because it reduces contrast and allows subtle texture to appear within the plumage.
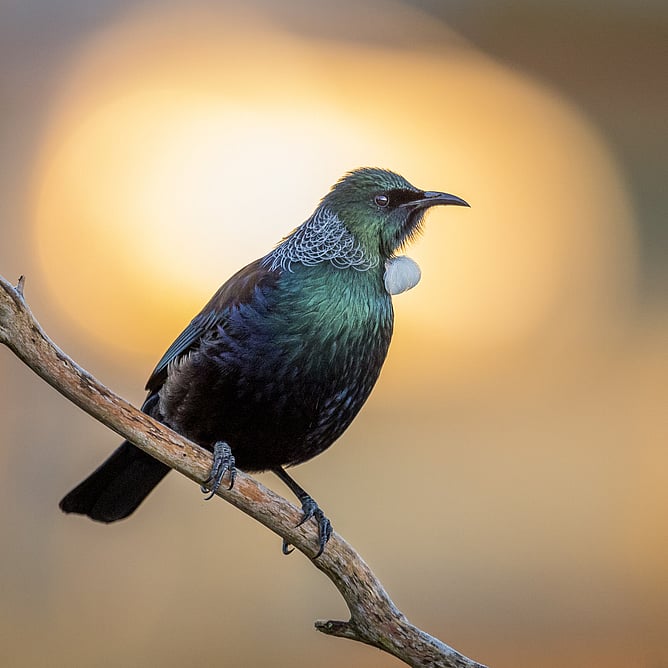
Overcast mornings can be fantastic for black birds, especially Tui. The cloud cover acts like a giant softbox, spreading light evenly across the feathers instead of creating harsh shadows and blocked-up blacks.
Early morning sidelight is also incredibly effective because low-angle light skims across the bird and reveals detail that would otherwise disappear in flatter conditions.
When working with exposure compensation, it is important to remember that there is no single “perfect” setting that works for every situation. The amount of compensation you use will always depend on the available light, the background, the direction of the sun, and the overall look you are trying to achieve in your image.
A white bird photographed in soft overcast light may only need a very small adjustment, while the same bird photographed in harsh midday sun could require much stronger negative exposure compensation to protect the highlights. Likewise, darker birds can need very different exposure adjustments depending on whether they are backlit, front lit, or sitting against a bright sky or dark background.
The settings and examples throughout this guide should be treated as a starting point rather than strict rules. Exposure compensation is simply a tool to help guide your camera toward the result you want.
Understanding Metering Modes
Now this brings me to metering modes, one of the most important parts of understanding exposure in bird photography. Metering modes control how your camera reads the light in a scene and decides what exposure it believes is correct. Different situations call for different metering methods, especially when photographing birds with difficult plumage or challenging backgrounds.
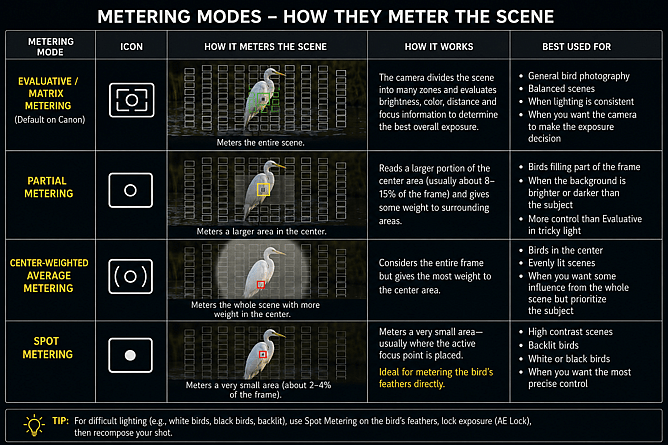
Most cameras offer a few main metering modes. Evaluative or Matrix Metering is the most commonly used and is often the default setting on cameras like the Canon EOS R5. This mode analyses the entire scene, looking at brightness, shadows, colours, and focus points to calculate what it thinks is the best overall exposure. It works very well in balanced lighting situations and is great for general wildlife photography.
Centre-Weighted Metering still looks at the whole frame but places more importance on the centre of the image. This can be useful when your subject fills a large part of the frame and you want the bird to influence the exposure more than the background.
Spot Metering is where things become really powerful for bird photography. Instead of reading the whole scene, spot metering measures only a very small area, usually linked to your focus point. This allows you to meter directly from the bird itself rather than letting the background influence the exposure.
This is the mode I personally use most when photographing birds, especially subjects with black or white plumage. If I am photographing a tui in harsh sunlight, for example, I can place the spot meter directly on the white tuft of feathers and expose specifically for that area to make sure the highlights are protected. The same applies when photographing white birds like spoonbills or egrets where preserving feather detail is critical.
What I really like about spot metering is the level of control it gives me. Instead of the camera trying to average out the entire scene, I can decide exactly what part of the image matters most and expose for that. It takes a bit of practice at first, but once you become comfortable with it, it becomes much easier to consistently achieve clean highlights, detailed shadows, and more professional-looking wildlife images.

The Best Light for Photographing Difficult Plumage
Light quality plays a massive role in successfully photographing white and black birds.
Soft early morning light is often ideal because contrast is naturally lower. White birds retain detail more easily, while black birds reveal texture without crushing shadows.
Golden hour light also adds warmth and depth to plumage, creating a far more pleasing image overall.
Late afternoon offers similar advantages, particularly when the sun sits lower in the sky and produces softer directional light.
Overcast conditions can sometimes be even better, especially for dark birds. Diffused light removes harsh contrast and allows your camera to capture detail evenly across the frame.
Harsh midday light is usually the most difficult time to shoot. Bright overhead sun creates extreme contrast, making it incredibly easy to blow highlights on white birds or lose detail in black plumage. I generally avoid these times or search for birds in shaded areas.
If you do find yourself shooting in midday conditions, slowing down and carefully monitoring exposure becomes essential. Small adjustments in shooting angle can sometimes make a huge difference. Even repositioning yourself slightly can reduce harsh reflections or improve how light falls across the feathers.
Final Thoughts
Photographing white and black birds teaches you some of the most valuable lessons in bird photography because it forces you to truly understand exposure and light.
There is no perfect universal setting for these situations. The real skill comes from learning to interpret the scene in front of you and making adjustments instinctively as conditions change.
The more time you spend watching histograms, studying light, and understanding how your camera reacts to difficult plumage, the more natural exposure control becomes.
And once it clicks, you will find that even the most challenging birds become far easier, and far more rewarding to photograph